Easy Yarn Crafts - Yarn Wrapped Letter & Dream Catcher · Craftwhack
You lot might be looking for a way to incorporate yarn into your craft projects, and the great news is that yarn can be used for many things besides crochet and knitting. You can employ yarn in all sorts of different means to bring texture and color to many kinds of crafts.
Both of these like shooting fish in a barrel yarn crafts tin can be done with the help of children, and so they make perfect moisture-day activities for any family.
Yarn-Wrapped Letter
 Source: https://www.catchmyparty.com/blog/diy-how-to-make-a-yarn-wrapped-ombre-monogrammed-letter
Kids beloved spelling their names and anything that represents their proper noun can provide excitement, so yarn-wrapped messages are a great way to become them engaged. They are as well prissy and simple and don't require a lot in the way of materials!
You tin make lots of messages and spell out dissimilar names, or just i alphabetic character. These make lovely gifts, too!
Materials
A yarn alphabetic character will demand:
- Potent cardboard
- Yarn in multiple colors
- Decorative items (e.g. diamantes, gems)
- Scissors
- Glue
- Pegs
- A pencil
- A ruler
- A craft knife
- A cutting board
Step 1: Draw Your Letter of the alphabet Onto Menu
First, lay your card out apartment and describe the letter. Make information technology nice and large and articulate. You could print a template out from the internet if you're struggling to get it as neat every bit you would like it to be.
If you are going to do multiple letters, it's best to write them all out at one time; this will make it easier to friction match the size and mode. Depict yourself some guidelines to represent the height, bottom, and midpoints of your letters so that you tin can go the sizes right.
Stride 2: Cut Out The Letters
Put your cardboard letter on acme of your cut board and use a craft knife to go around the edges. Using a craft knife will give y'all a much amend finish for the messages than using a pair of scissors, which are more likely to bend the edges.
Take your time and become slowly. It'south best to practise this function without your child around so that you can focus and you lot don't need to worry nigh small fingers almost sharp knives.
Step iii: Wrap The Messages
Make up one's mind what colors you're going to use and how you desire the letter to wait. If you want to endeavor out different effects, peg the cease of the yarn to the letter and wind information technology approximately into position earlier yous start sticking annihilation. You can arrange most of the alphabetic character before you have to commit to any part.
Let your child help yous with this part and ask what they think. If you lot're using multiple colors, which color should get at the pinnacle? Where should the gem sit?
When yous're happy with the design, put a dot of glue on the back of your letter of the alphabet, at either the top or the bottom. Peg the cease of the yarn in place, and begin to carefully current of air the yarn around and around the letter.
Don't pull then tight that you bend the card, but wrap in neat lines. Put dots of glue on the carte du jour as you wrap and utilize your pegs to brand sure that the yarn doesn't suddenly sideslip or autumn off the letter.
Step 4: Decorate
You can decorate the letter nonetheless you like. Go your child to assist you pick some footling stick-on pieces, such every bit net flowers, pearls, beads, stars, or anything else. You tin as well leave parts of the card uncovered and either stick pretty paper on or fifty-fifty draw on top of it.
Information technology often looks great to utilize a thinner yarn for some bits of the letter, as well, then think about the textures and event yous're making. You lot can create something actually beautiful for your child's room with minimal expense or difficulty.
Step v: Hang The Letter (Optional)
Y'all will probably want to hang the letter up when it's finished. To practise this, merely punch a hole in the top and use a similar color yarn or a clear thread to suspend information technology.
If you have fabricated your kid's full name, you will probably want to hang the letters in an arc. To practise this, cut a long slice of thread and hang it between 2 tacks. Adjacent, hang the letters from it, adjusting the lengths of the threads they hang from if necessary to go a nice effect.
You'll soon take a magazine-worthy wait with only a few hours and fleck materials!
Yous tin can besides make these letters from wood if y'all would like them to be more substantial; if yous practise, they will probably look better standing on a bookshelf, rather than hanging.
Dream Catcher
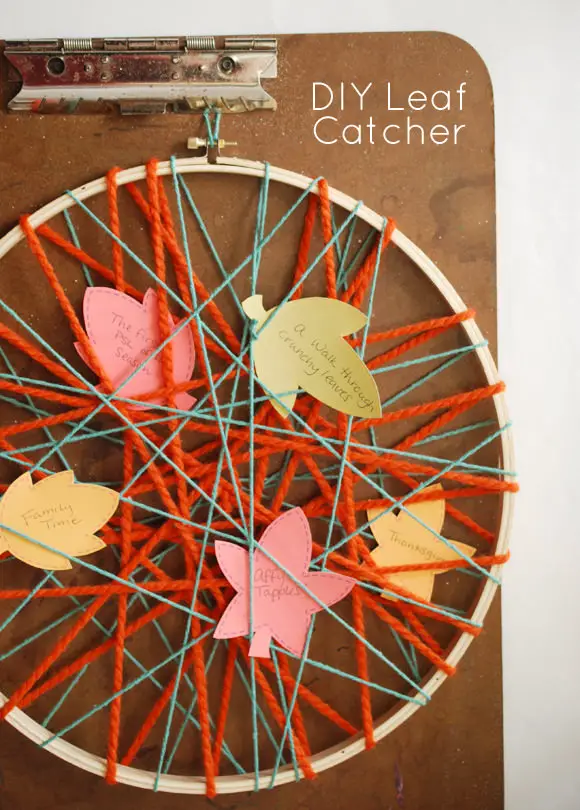 Source: https://www.handmadecharlotte.com/diy-leaf-catcher/
Dream catchers are a magical matter to add to any babyhood, and they are very easy to brand with your kid.
Materials
For this projection, you're going to demand:
- Colorful yarn
- An embroidery hoop
- Decorations such as feathers, one-time earrings, glow-in-the-dark stars, etc.
- Scissors
- Glue
- Peg
Stride 1: Wrap The Dream Catcher
Become your child to choose which color they would like first, and then utilize a dot of glue and a peg to secure this on one border of the embroidery hoop. Help your child carefully wind the yarn around the dreamcatcher, crisscrossing it dorsum and forth over itself.
You tin alter color at whatever bespeak by only tying off the kickoff color and and so repeating the procedure. When your kid is happy with the look, add a few more spots of gum to brand sure the yarn is secure, and move on to the next step.
Pace 2: Decorate The Dream Catcher
Help your child think near what decorations they would similar to add together. Practise they want shiny buttons? Would they like skeleton leaves? What sort of dreams would they like the dream catcher to catch?
They tin can add tiny mascots (erasers are good) of their favorite animals or a bit of glittery thread for a nuance of magic. Dangly earrings that accept lost their pair volition too wait lovely on a dream catcher, and they are very easy to add.
Feathers are another pop option, which tin can be nerveless from the garden or purchased in all sorts of pretty colors. Some people also like to write wishes or good memories on scraps of paper and add these to the dream catcher.
Footstep 3: Hang Information technology Upwardly
One time the dream catcher is consummate, you demand to knot a loop of yarn over the top, and then tie a long loop so that it can hang down freely. Add a tack to a higher place your child's window or over their bed and suspend the dream catcher.
Brand sure information technology won't drop downward on them in the night, and and then your child can wait forward to some wonderful dreams under their very own handmade dream catcher.
Determination
Yarn is very versatile and you tin can mix and match whatsoever color combinations you similar, calculation in other decorations to brand it prettier, or keeping it very simple. Information technology is a wonderful way to decorate your room or a child's room, and it's also an inexpensive fabric to play effectually with.
Both of these crafts can be done as a fashion to use upward yarn scraps, so if you knit or crochet and end upwards with lots of little ends, this is a perfect solution. Choose some nice colors and get busy turning them into something beautiful!
Source: https://craftwhack.com/easy-yarn-crafts/
0 Response to "Easy Yarn Crafts - Yarn Wrapped Letter & Dream Catcher · Craftwhack"
Post a Comment